Tuesday, May 8, 2012

The Plantings are In! Amazing Poached Scrambled Eggs

A Salad From "Out Back"
It's an exciting time of year for all gardeners - especially those of us who like to think of ourselves as urban farmers!  This is actually my first year methodically researching, planning, and planting a LOT of edibles.  It has been a lot of work and a good deal of research and bugging friends with endless questions and agonizing over making selections. As of this week, almost all of the planting in our plots and planters has been completed.  We will be spreading some of our fabulous, rich mulch around (the first use of the output of our composter!) in a few days.  Now it is time to hope that the weather, the soil, potential hazards (bugs, etc.), and a ton of other variables cooperate and those little seedlings and heads of green popping up through the dirt will become wonderful things. This years plantings include:  multiple varieties of tomatoes, cucumbers, zucchini,  two kinds of eggplants, too many kinds of peppers to list - hot and sweet, little and big - kale, Swiss chard, mustard greens, and potatoes. We have been feasting on spinach, arugula, early potatoes, and assorted lettuces for awhile now.  Our herb garden is chock full of onion and garlic chives and multiple basil plants, marjoram, French sorrel, common sorrel, thyme, sage, a couple kinds of oregano, par-cel, and flat leaf Italian parsley.  Whew! Looking at all of that is giving me just a tad of anxiety, I must admit.  It is my intention to keep a running dialogue going here as to how this is all going in our little city garden.  And of course, as things get more identifiable, I hope to be posting some good pictures.  Lastly, I will keep sharing seasonal recipes, and other amazing new find recipes that I have to share.  This following recipe is just amazing, not necessarily seasonal.

Recipe:  Daniel Patterson's Poached Scrambled Eggs


This recipe?  It's a game changer - at least for me it is.  We love eggs.  We are lucky to have a number of sources for fresh, local eggs from pasture raised chickens.  We easily go though a dozen eggs a week, so a new recipe or a new method for much loved preparations always gets my eye.  This recipe is amazing!  If you love scrambled eggs, you will be blown over!  I have made these scrambled eggs three times so far in the week that I have known about the technique.  It's a very forgiving technique, so don't get hung up, you can do it! The fluffiest scrambled eggs you will ever have!  Really!

Serves 2


4 large eggs
2 tablespoons extra virgin olive oil (optional)
Sea Salt
Freshly ground black pepper


Use FRESH eggs.  If your eggs are old - if they came from the supermarket and their age is suspect, the creator of this technique recommends cracking each egg into a medium mesh sieve to let the thin white drain away.  Fresh eggs don't need this step; I haven't used it.

Beat your eggs vigorously with a fork or whisk for 20 seconds.

Set a medium sauce pan filled nearly to the top with water over medium heat.  Put a strainer in the sink.  When the water is at a low boil, add a few large pinches of salt, then stir the water in a clockwise direction to create a whirlpool.  Pour your beaten eggs into the moving whirlpool.  Cover the pot and count to 20.

Turn off the heat and uncover the pot.  The eggs should be floating on the surface of the water in ribbons. While holding back the eggs with a spoon pour off most of the water over the strainer. Gently slide the the eggs into the strainer and press them lightly to expel any excess liquid.  Tilt your strainer from side to side to release any trapped water.  You can put the eggs on a paper towel if you really want to insure all liquid is gone.  I haven't done that - the strainer and tilting it seems to be enough.

Scoop the eggs into serving bowls and drizzle each with the extra virgin olive oil.  Season with salt and pepper.  I have been adding chopped chives - because I have them, and I love the flavor they add.

The possibilities are endless - the flavor and consistency of the eggs is absolutely delicious and wonderful, and once you do it, you have the technique and you'll get more efficient with it.

Try it!

Friday, April 13, 2012

Talking Eggs and the wonder of Ramps!

There is much in the news over the past few days concerning horrific conditions discovered at an egg factory here in Pennsylvania.  Kreider Farms in Manheim was cited by the Humane Society for deplorable conditions.  They of course deny it.  Their statements have run all of the way from "that's the old factory" to "people don't understand egg production on this scale - what they are seeing isn't unusual or cruel".  Really?  Without going into detail, when you see the report and some of the pictures, you know that you would never, ever want to support a business like Kreider.

So, again, we are talking about eggs and egg "production".  We constantly get queries as to where to get good eggs - eggs that are fresh, disease free, and not produced by abused tortured chickens.  Many folks are especially stumped because most of the area Farmers Markets are not back yet.  So, while they buy eggs from farmers during the Spring and Summer, they don't know where to get them the rest of the year.  In my opinion, the supermarket is never a consideration.  Even "good" factory eggs are old, mostly from chickens treated with something or another, and they lack color and flavor.  That said, we are lucky in our region because, even in the absence of Farmers Markets, there are plenty of sources of fresh, non chemically treated eggs produced by pasture raised chickens.  Fair Food Farmstand in the Reading Terminal Market is for the most part, our source.  Clark Park and Rittenhouse Square Farmers Markets operate year 'round and are another source.  Green Aisle Grocery on Passyunk brings in farm eggs regularly.  And there's the Ardmore Farmers Market, and the Mt. Airy Co-op - both are also good sources of fresh eggs and local products. 

The point is, you will need to do a little "work" to see what vendor will be the best for you.  Take a drive, look for small Farmstands - do some testing.  If you have been using factory produced eggs, you will experience immediate differences:  those gorgeous orange yolks, the lucious thick whites (great in making omelets fluffy), and the wonderful flavor will hook you.  Once you've left factory eggs behind, you just can't go back!

Recipe

"Tis the season for wonderful "here today and gone tomorrow" Spring treats.  Last post was Fiddlehead Ferns.  Here is a simple recipe for another wonderful Spring offering.

Ramps sauteed in Butter

Clean ramps the same way you would green or spring onions.  Cut off the root ends and soak in ice cold water to remove excess dirt.  With these two bunches I first cut off the white part, tossed those pieces in melted butter and cooked them for about 3 - 4 minutes. Then I added the green part of the ramps - chopped in half only.  I added a bit more butter and some sea salt and freshly ground pepper.  When the whole mix is soft and the aroma is filling the whole kitchen, remove them from the heat.  From there it's up to you.  You can eat them as is.  You can make a brushetta by topping a piece of toasted bread with the mixture. I chopped up these ramps and added them to caci y pepi - pasta tossed with butter, cheese and pepper.  The flavor was amazing!  If you want to try ramps, get to the market now!  They aren't around very long at all.  I am going to try growing them from plants I got from a local farmer.  It will take awhile though - definitely until next Spring.  So, meanwhile, I am going to hunt down some more!!  Enjoy.


Ramps Sauteed in Butter with Salt and Pepper


Ramps fresh from the Farmers Market


Tuesday, April 3, 2012

Consider: "The Ten Dollar Solution"; Recipe: Fiddleheads

The Farmers Markets will all be open soon - both here in Philly and around the Region. The products carried by Fair Food Farms will also be changing weekly at a much faster pace than over the winter months.  Many of us will be growing lots of fresh vegetables, fruits and herbs, as well. It's all good. 

I love our local markets and cannot imagine life without them, but I also enjoy a bit of a road trip once in awhile to stroll around other markets, to stop at roadside stands, to meet other farmers and purveyors, and see what's selling.  I hear that some people look at houses!! Odd!

As we look forward to the Markets all returning, consider this, please.

If every household in Pennsylvania spent $10 a week on locally/regionally produced food, $48 million dollars would stay in the local economy each week.  Spending your money on locally grown and produced food sustains the community, provides us with a better quality of food (fresher, tastier, safer) and thus provides better nutrition, preserves family farms and the businesses of small producers, generates jobs, and beautifies the urban and rural landscape.  Ten dollars a week!

I can't imagine that this isn't the case for other regions as well, although, as I like to remind folks - we live in an incredibly rich region of farms, independent producers, and markets.  We're very lucky, but we have to sustain those farms and producers and markets.

Remember:  A typical supermarket carrot travels over 1800 miles to reach your plate and the "average" supermarket egg (not discussing all of the other things wrong with it) is at least 45 days old when you buy it. 

Check out:  www.buylocalpa.org for more information.

Enjoy these glorious days.

Recipe

Garlicky Fiddlehead Ferns

Ingredients:
1/4 to 1/2 pound of fiddle heads does very well for two people

Fresh garlic, peeled and minced (3 cloves)

Good extra virgin olive oil (2 or more tablespoons)

Butter, unsalted (2 tablespoons)

The Herb of your choice - we like dried Thyme, or fresh Parsley - really whatever is on hand (2 - 3 tablespoons)

Dried red pepper flakes, Sea Salt, and Freshly Ground Pepper

Technique:

Clean the fiddleheads well, remove any fuzz found in the curl of the fiddlehead (just run your finger thru the curl and then give them a rinse)

Dry the fiddleheads very well; we use our salad spinner.  You could use a produce bag and just swing it around - however you approach it,  you want to get them nice and dry

In a skillet heat the extra virgin olive oil AND the butter until hot

Add the fiddleheads and the garlic to the oil and butter mixture, cooking over medium heat, stirring occasionally until the fiddleheads get a bit of crispiness to them - tasting them helps the judgement process

Add the herb you have selected, sea salt and freshly ground pepper and if you want a bit of a kick, add a small scattering of dried red pepper flakes and give it one more good stir

Serve Hot.  They make a great side dish and they are wonderful on brushetta.  They literally taste of Spring!

Enjoy!  They aren't around very long!

Fiddleheads before cooking


Tuesday, March 20, 2012

Happy Spring! The Growing Season is Here!

Hello All and Happy Spring!

What passed for Winter was pretty surprising wasn't it?  I guess we're all happy that - after things started poking up and sprouting blooms - we didn't get hit by some late year snow.  It was indeed the strangest winter I can remember, but certainly easy on those energy bills!

The last few weeks have been a whirlwind here at Il Moya.  Measuring for a new, gigantic (for us) standing planter -  our third; ordering seeds & transplants; trips to the garden centers for soil, etc. and clearing all of those Christmas tree boughs that we spread throughout the garden have kept us pretty busy. 

There is a lot of start up - as you Gardeners know - to prepping for planting and growing.  This year, for the first time, we went with more seeds than transplants for edibles and herbs.  Because of that, our kitchen has become a "nursery" of sorts - seed trays are spread out all over - catching precious light from our southern facing window.  Two of our tomato seedlings  - Brandywine Pink (an Heirloom) and Sweet Current (teeny, tiny cherry tomates) - are "up" and thriving in their trays.  We have assorted sweet and hot peppers in, jalepenos, and Black Beauty eggplant as well.

Outside, the French Breakfast radishes, Arugula, Kale, Simpson "Envy" Lettuce, and Mustard Green seedlings have all appeared - we've already had to thin the radishes.  The Sorrel is just starting to emerge as of this morning. Yesterday we planted a few spinach plants - we saw them at the garden center and they looked so healthy, we couldn't resist.  We have a lot more in the way of seed planting to do as the weather warms, but this first round of "colder" crops is something we always enjoy. We both love leafy greens.  Not to mention that sitting outside with a cocktail on a Spring evening, picking mature Arugula leaves and wrapping them around little slivers of smoked salmon is an absolutely decadent and delicious way to kick off the season!

Recipe:  Spring Pasta

Ingredients

1 pound of "little" pasta - any small, compact pasta that you have on hand

2 - 3 fresh lemons

A stick of butter

Fresh Italian (Flat Leaf) Parsley

Heavy Cream  (1/4 cup or more)

A hunk of Parmesan Cheese & Salt & Pepper to taste

Dried Pepper Flakes

Boil your pasta in heavily salted water (always, always close to 'sea water') to just al dente - a few minutes short of the package instructions

While the pasta is cooking, in a saute pan, melt the butter, add the zest of one lemon, add the juice of all of the lemons - you want about a heavy 1/2 cup of fresh lemon juice all told (do not use "bottled" lemon juice - don't bother).  Add some freshly group black pepper and bring the mixture to a low simmer.

Drain your pasta (save about a cup of the pasta water in case you want to thin your sauce)

Put your pasta in the saute pan and cook the pasta for a minute or two in the sauce.

Add about 1/4 cup of heavy cream - or less if you want a very light sauce, more for a richer sauce. Stir to incorporate the sauce, cream and pasta.  Add more freshly ground black pepper to taste - lots of pepper really picks this up!

Off the heat, garnish with some fresh chopped parsley and some grated cheese.  Serve immediately with the pepper flakes on the side.

Happy Spring!


Wednesday, February 8, 2012

What are your favorite kitchen tools? What couldn't you live without?

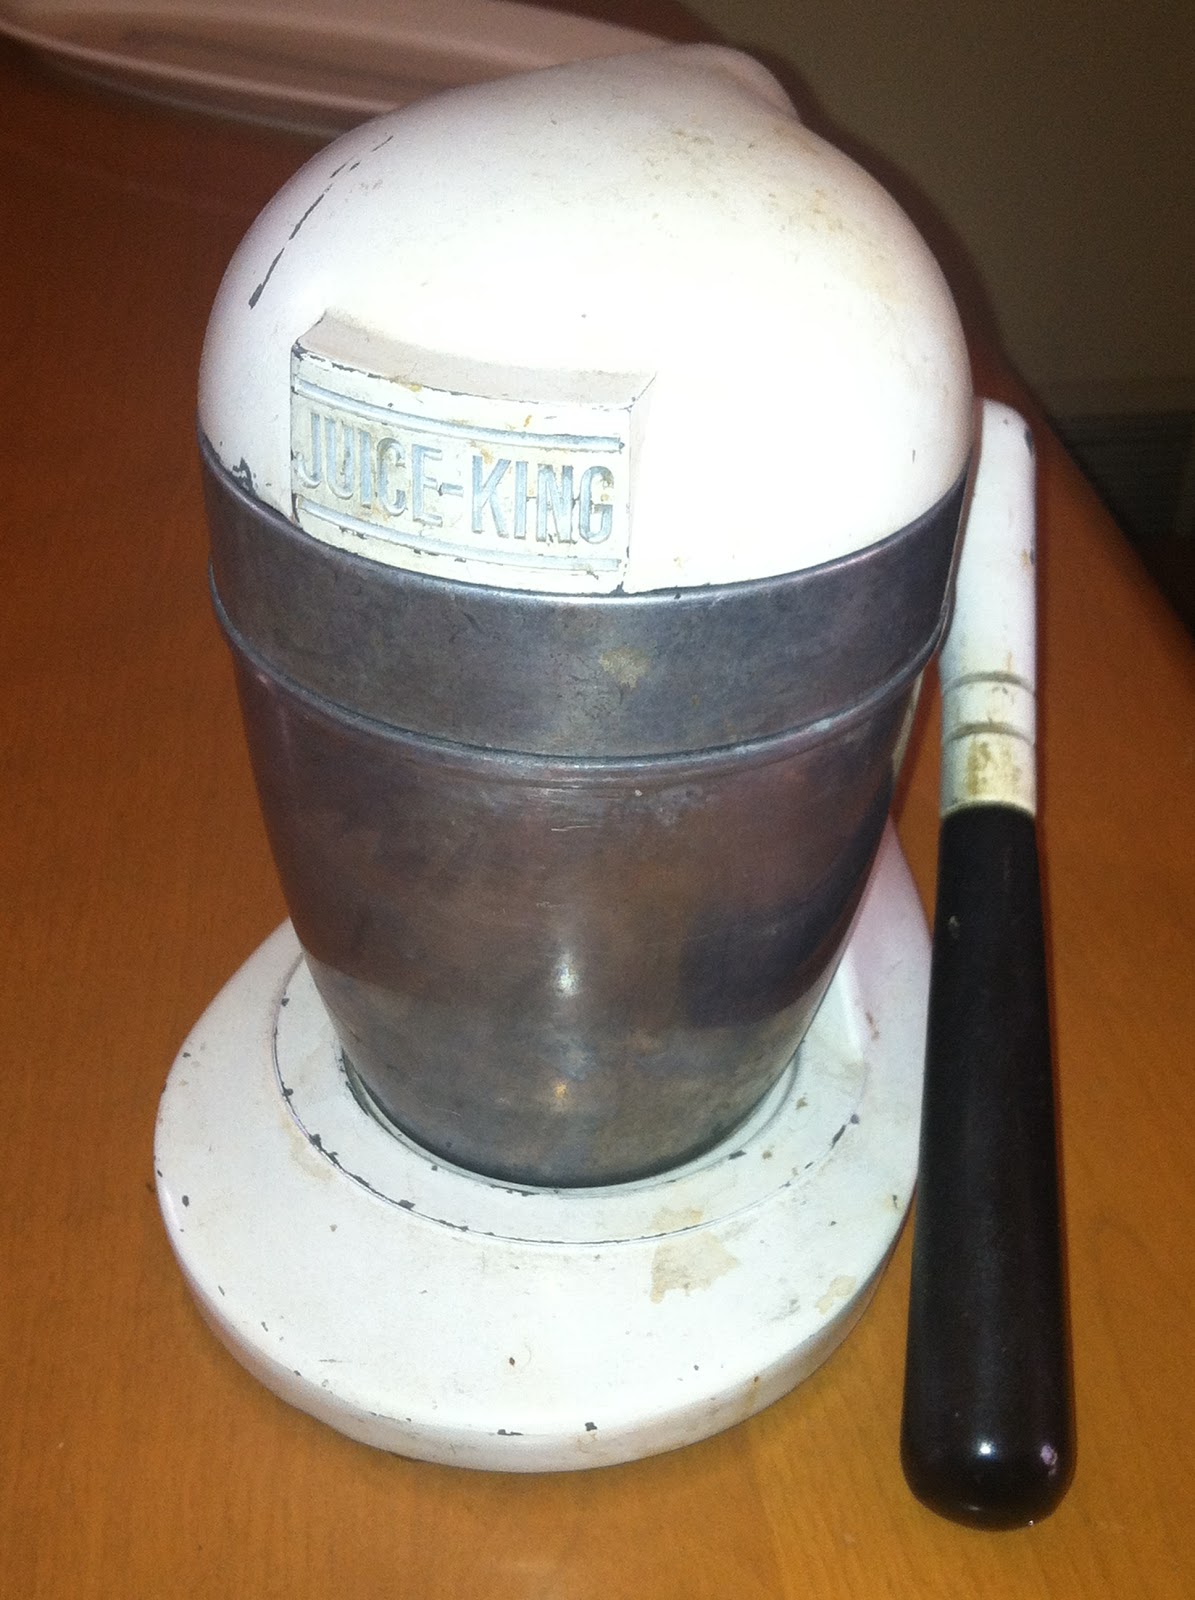
The Saveur 100 for this year (January 2012) lists the "antique juice press" (p.18) as their 12th favorite thing.  We were sort of thrilled because, although we have a large collection of retro kitchen tools (veg - o - matic, ice crushers, etc.) our Juice King IS our go to juicer.  People assume that being the crazed cooks that we are - and we are, we are aware of that - that we had some sort of big juicer. 

Frankly, over the years - and it did take some time - we learned that, indeed, less is more.  We have slowly been getting rid of all sorts of nifty gadgets and machines which have ended up stored in our basement.  Let's face it, a pannini maker takes up a lot of space (which in city kitchens most of us don't have) and a cast iron pan with a stone mortar sitting in it will flatten any sandwich on earth! Frying? Certainly a Dutch Oven, a thermometer, a "spider" to lift things out of oil and you're set as far as frying goes.  Life without a good, industrial grade Kitchen Aid Mixer would be tragic and I am blessed to have one - and the ice cream maker attachment and the sausage maker attachment, and a pasta maker attachment - you get the picture. These attachments are all small and easily stored (the ice cream maker lives in the freezer).  And they make great gift ideas for folks who buy you gifts!

And, of course, as we all should know, if you are going to spend some money on something - let it be knives.  Please, let it be knives!  Having cooked in other people's kitchens a lot over the years, I am now convinced that this is the big missing piece for many home cooks.  There's only one kitchen in which we find sharpened knives - along with lots of other good stuff  and really enjoy cooking away from home (you know who you are, Larken Springs Farm!).  Also, one 12 inch non - stick pan is probably enough.  Cast iron is a necessity.  A good chef's pan is very utilitarian.  A roaster is necessary if you do Thanksgiving or roasts at any time of year. A pasta pot is great to have.  A well aged wok is a thing of beauty.  We're partial to All -Clad - it's great, durable and made in Pennsylvania.  All of these contribute to the texture and flavor of what is cooked in them and are irreplaceable for some foods/dishes. You know what you use, what kinds of food you prepare and how much room you actually have, so start from there.

What I am saying is, if you are frustrated with your overflowing kitchen cabinets  - and again, most of us whose kitchens are in the city are constantly fighting that battle - give some thought to what you really need, what kinds of food you cook,  what can serve "double duty", and what you really use - and be honest, what is totally unnecessary and spends its life in a storage closet.

What kitchen tools could you NOT live without?  What are you contemplating for the Spring tag sale?  What tools have you learned multiple uses for?  Example here:  we have a wonderful cast iron mussel pot - we love mussles and make them a lot and the pot is fun and so great to bring right to the table loaded with steamed mussles and their liquer in which to dip crusty bread.  That said, I have also learned that the same pot - with no impact on its mussel steaming capacity - makes a great loaf of "no knead" bread.  Yipee two uses!

I'd love to hear from you.  We can definitely learn from each other.

Here she is - she's a work horse, she's ancient  - and she's very, very efficient!

Tuesday, February 7, 2012

Where's Winter? The Olive Oil Cake Recipe - You'll be making it a lot!

Gardening Thoughts:  Who among us - and by "us" I am referring to gardeners, growers, small farmers, urban farmers, and the like - is not more than a bit concerned as we turn the corner into February and our area temperatures continue to act like it is Spring!?  This situation is not just affecting our tri-state area, but is impacting the whole of the Eastern seabord.  Any areas that should have predictably frozen ground by now and doesn't is feeling this impact. I go out to fill the bird feeders and I see buds on my flowering plants, daffs pushing up through the mulch and I cannot stop all of the garlic I planted from throwing off green shoots!  Add to all those things the fact that our ground is definitely not frozen.  The folks at Landreth Seeds are warning us that this weather may lead to widespread Blight.  They suggest using a copper fungicide, which will have to be tilled into the soil, and seedlings will need to be dusted regularly.  Worrisome.  But still I know that by now all of us have the catalogs marked up, have planting diagrams drawn, and are lusting after new "toys".  It's February and regardless of the temperatures, we're dreaming of Spring.

Food News:  Wasn't it heartwarming to see that the Federal Food and Drug Administration (FDA) - who is supposed to represent the American people - decided to hide the identity of the chain restaurant (Taco Bell) guilty of a limited outbreak of salmonella?  Reports from both the Center for Disease Controls (CDC) and the FDA refer to "the source" and/or black out the words Taco Bell from written reports.  Huh?  Again, we see the FDA serving as handmaiden to agri-business at the expense of the health of the people.  For those of us who used to think that the lobbying strength of the NRA was potent; think again.  As I have said before, agri-business is running scared.  We as consumers are getting educated, we are asking the right questions. and we are more and more choosing local, seasonal, real food.  Keep yourself up to date; these seemingly little things add up to a lot.

Recipe - Olive Oil Cake:  This recipe is ancient and it is believed to have originated in the area of Verona, using the local olive oil of that region, which many Italians believe is the best olive oil in all of Italy.  It is delicious and versatile - enough so that my little "touch", the limoncello glaze, works very well, but is not necessary; the cake alone is delicious.

Cake Ingredients (Bakes best in a 2 1/4 quart tube pan)
2 eggs
1/2 cup plus 2 tablespoons granulated sugar
The peel of 1 lemon, grated
salt
1/3 cup of dry Marsala Wine
1/3 cup of whole milk
3/4 cup of the best extra virgin olive oil you can get, plus some oil for the baking pan
1 tablespoon baking powder
11/2 cup all purpose flour

Preheat Oven to 400 degrees
Beat the eggs and all of the sugar until the mixture becomes pale and foamy
Add the grated lemon peel, salt, Marsala wine, milk, and the 3/4 cup of the olive oil - mix until all is fully incorporated

Mix the baking powder to the flour and add to the other ingredients; mix thoroughly
Smear the inside of the tube pan with a thin coating of olive oil - best done with your hands!

Pour the batter into the pan; bake in the upper third of a preheated oven for 50 minutes - again, if your oven is at all finicky or unpredictable, I would start checking at around 40 minutes.

Let the cake cook for 10 minutes, loosen it from the tube and sides of the pan with a knife, unmold it and place it on a cooling rack until it comes to room temperature.

NOTE:  if you are going to glaze the cake, do it after you put it on the rack, but do it when the cake is warm.

Limoncello Glaze Ingredients:
The juice of two lemons (use the lemon you grated!)
1/4 cup of Limoncello
Four Tablespoons of sugar
Two pats of butter

NOTE:  Limoncello is an Italian liquer made from lemons and overproof alcohol or vodka.  It is served iced cold and can serve as an appertivo or a digestivo.  There is always a bottle of limoncello right next to the vodka in our freezer - it is delicious and verstatile. And, it is readily available in Pennsylvania State Stores!

In a saucepan, put the lemon juice, the Limoncello, and the sugar.  Stir and dissolve over medium heat; when the mixture is incorporated, raise heat to medium high heat and reduce the mixture by about 1/3 - you just want it to thicken a bit.  When you are happy with the consistency, add the two pats of butter and whisk it - off heat -  until the butter is incorparated.

Brush the glaze all over the warm cake - inside and out - be generous!  The cake will absorb the glaze and that's OK.  Sprinkle with confectioners sugar if you wish.

Limoncello Glazed Olive Oil Cake

Thursday, January 19, 2012

A Savory "Dutch Baby" Recipe to Chase the Chills

So the last few days have made the impression:  it's Winter, fellow foodies, and time for hot, rich, bubbly, soothing and comforting foods!

For Brunch last Sunday, I was thinking pancakes - but then that's always an issue in our home as my much better half is missing the sweet tooth gene.  So, I did what I usually do for inspiration.  I stare into the "fridge, the pantry, the freezer - one or all, depending on what I think I am looking for.  I had a lot of apples and a nice big block of a Vermont white cheddar.  I started trying to remember what those big, one pan pancakes were called and found a note in my food journal re: the "Dutch Baby". The recipe I had was for a sweet Dutch Baby - but I didn't see why I couldn't use the same basic recipe and adapt it to the apples and cheddar.  The Baby works best if baked in a well seasoned cast iron pan.  And it is best if you serve and eat it immediately.  And, like a souffle, it will rise and look absolutely fabulous when you take it out of the oven, and, yes, it will drop like a flat pancake in seconds.  Doesn't matter - it's delicious!!!

Recipe:  Savory Dutch Baby

Ingredients for a savory Baby:  2 or more tablespoons of unsalted butter for the pan; 1/2 cup whole milk; 1/2 cup of regular flour; 3 eggs; 1/8 cup of sugar (obviously the sweet Baby uses more sugar, but you do need a little sugar to get things going); 1/4 teaspoon baking powder; 1 teaspoon vanilla; two apples - cored and peeled and cut into 1/8ths; and 3/4 cup shredded cheddar cheese.


Savory Dutch Baby Ingredients


Preheat oven 425 degrees

Melt a tablespoon or more of the butter in a well seasoned cast iron skillet.  Add the apple slices and allow them to brown a bit - when they are done to your liking, add the rest of the butter or more if you have already used the two tablespoons. You want the cast iron pan nicely buttered.


Cook the Apple Slices in Butter


Mix all of the other ingredients, including the grated cheese,  until well blended.  Pour the blended mixture into the skillet over the apple slices.

Put the mixture in the skillet on a center rack of your oven and bake for 20 - 25 minutes.  Keep an eye on it.  Ovens are finicky and different and souffle - type things are as well!

When it's done, it will be starting to darken and be very puffy - again, like a souffle.  Pull it out of the oven and admire it; it will sink down on itself in a few minutes - but that's OK.

Slice it up and enjoy.  The melted cheddar "disappears" into the pancake, but it's flavor comes right through, and the apples will be very carmelized at the bottom of the Baby.  A very delicious combination.  You can dot some butter on it by the slice, which would be gilding the lilly in a very good way!


Savory Dutch Baby