Friday, December 27, 2013

Readers Requested Recipes

I hope all of you are having a wonderful, relaxing, revitalizing & tasty Holiday season.

Over the past few days I have posted a few favorite holiday dishes - I use them because they are just my kind of seasonal, easy and delicious recipes.  At this time of year I spend a lot of time in the kitchen as I know many of you do as well. As a matter of fact, even when friends and family are here, and I am not cooking, I am in the kitchen!  It really is the place where folks gather isn't it? That said, it is nice to exit the kitchen once in awhile - but when we're entertaining, I have a dickens of a time moving the group out! I bring this up because it is my goal to have as much cooked, baked and finished when guests arrive or else in our small home it looks like I'm conducting a cooking class! So the recipes I choose are almost always done or just need a few steps to be complete when folks arrive.

I was so happy to hear from a number of folks requesting the recipes for some of the recent dishes I posted on my Facebook page. So, let's start with a favorite and versatile dessert that is always a hit and really straightforward and easy to put together. And it is even better if you make it the day before you are going to serve it!


Recipe:  Pisciotta - Olive Oil Cake with a Limoncello Glaze (adapted from the late, great Marcella Hazan) 

Ingredients

Two large eggs
One half cup, plus 2 tablespoons of granulated sugar
The zest of one lemon
Kosher salt
1/3 cup dry Marsala (not something we always have around, so I have substituted cognac, and once, bourbon)
One third of a cup of whole milk
Three fourths of a cup of extra virgin olive oil
One eighth of a cup of extra virgin olive oil - for greasing the cake pan
One tablespoon of baking powder 
One and one half cups of all purpose flour
A round cake pan

Technique

Preheat the oven to 400 degrees
Break the eggs into a bowl and whisk them with the all of the sugar - you want a pale, foamy mixture so whisk well.  You can also use a mixer.
Add the lemon zest, a pinch of salt, the Marsala, the milk, and the 3/4 cup of olive oil. Whisk a bit to incorporate.
Mix the baking powder with the flour and add it to the other ingredients. Mix well.
Smear the baking pan with the rest of the olive oil and pour the batter into the pan.

Bake in the upper third of your oven for 50 minutes.

The cake is done when a toothpick comes out clean when pushed into the center of the cake.

When the cake has cooled for about 10 minutes, brush about a half cup of Limoncello liqueur all over the cake.  Wait a minute or two between brushings. 

Note:  If I have berries - strawberries or blueberries work best - and I have the time, I make a "Berry Concasse" to pour over slices of the cake.  Just chop the berries, add sugar to taste, and a shot or two of Cointreu or Triple Sec and bring the berries to a boil. Lower the heat to medium/low, stirring regularly until the mixture thickens.  Store in the refrigerator and remember to take it out about a half hour before service.

Enjoy!

Next Post:  Bourbon Chicken Liver Pate

Saturday, December 14, 2013

Recipes: Stay - a - Bed Stew and Our Favorite Jambalaya

As requested Readers.  Her are two of my favorite cold weather recipes:

Recipe:  Stay - a - Bed Stew (adapter from Peg Bracken, the "I Hate to Cook" cookbook).  With love and gratitude to Peg Bigley.

The name of this dish suggests what you can do while this easy one pot recipe long cooks.  And, oh, the aromas in the house!

Ingredients

Two pounds of stew meat, cubed, fat trimmed, but not entirely removed
One cup of cut up carrots (wash the carrots well and do NOT peel the carrots - all of the nutrients and most of the flavor are in that skin)
Two medium onions, chopped
One teaspoon kosher salt
Freshly ground black pepper to taste - at least a 1/2 teaspoon
One can of condensed Tomato Soup, mixed with 1/2 can of water - I have moved away from condensed soups, but sometimes you just have to go with the original!
Two - Three large potatoes, quartered
One tablespoon each of fresh Thyme and Parsely - chopped - OR use 1 Teaspoon of dried herbs


Technique

Mix all of the ingredients - except the parsley - into a 2 1/2 quart casserole
Put the casserole into a 275 degree oven
Cook for five hours

Remove.  Skim fat if any is floating on the top.
Top with the parsley and serve

NOTE:  Make it "Beef Bourgourgne" - add 1/2 can of red wine instead of water!  Impress folks.


Recipe:  Crawfish and Sausage Jambalaya (adapted from Emeril Lagesse, "Every Day's a Party" cookbook)

This is delicious and easy.  Feel free to substitute medium to large fresh shrimp - peeled and cleaned - for the crawfish. However, most good seafood vendors now carry frozen crawfish tales.  Look for Gulf Coast on the crawfish label.  Just defrost - they are delicious! As you will see, this recipe uses the New Orleans cuisine staple:  The "holy trinity" - onion, green peppers and celery!

Ingredients

Two tablespoons of Vegetable or Canola oil
Two cups of chopped yellow onions
One cup of chopped green bell peppers
One half cup of chopped celery
One teaspoon of sale
One half teaspoon of cayenne
One pound of smoked sausage (your choice; kielbasi is used a great deal and, I think, is perfect). Cut the sausages in half, lengthwise, then cut crosswise into 1/4 inch thick slices
Four Bay Leaves
Two cups of peeled, seeded and chopped canned tomatoes
One tablespoon of chopped garlic
One pound of crawfish tails or shrimp
Two cups of of long-grain rice
Five cups of low salt chicken stock
One half cup of green onions/scallions - green parts only

Technique

Heat the oil over medium heat in a Dutch Oven 
Add the onion, bell peppers, and celery and season with the salt and the cayenne
Cook, stirring, until the vegetables are wilted - about 5 minutes
Add the chopped sausage and cook, stirring, for about 2 minutes
Add the bay leaves, tomatoes, garlic and if you are using crawfish, add them now
Cook, stirring, for about 2 minutes
Add the rice and cook, stirring, for about 2 minutes
Add the chicken stock and bring it to a boil
Reduce the heat to medium - low, cover, and cook for 15 - 20 minutes
If you are using shrimp, add them now and cook for about 10 - 15 minutes more, until the rice is tender and the shrimp  are cooked
Remove the bay leaves, stir in the chopped green onions, and serve hot.

Enjoy both of these delicious, basically one - pot, cold weather comfort dishes.

Friday, December 13, 2013

The Heart of Urban Homesteading: Act Locally to Help the Hungry


Having spent a good deal of time working in the food services business, I am always happy to say that food people are among the best folks out there -  in so many ways.

I am one who thinks that sentiment also applies to we who like to think of ourselves as, "Foodies", Gourmets, or "Food Lovers".

Let's face it.  At this time of year, if we have what we need, if we are healthy, if our larders and freezers are stocked, and the ones we love are safe and happy - what more do we need?  I know what we need.  In the midst of all of the fun and revelery and feasting, we need to be able to get away from the "me" and focus on the "we" for a bit - especially the "we" who are needing some help. The "we" who are hungry. 

Who better than those of use with a deep love and appreciation for all things edible than for us to use our passion to be part of helping to address - in our own local way - hunger in America.  Just typing that phrase makes my skin crawl!  It should not be, but it is.  And remember, so many of those Americans are children.

All I ask of those of us who chat on this blog and on my FB page is please, do at least one thing this Holiday season to help feed hungry people in your own city, town or neighborhood.  Donate cash to a local food program - they will know what to do with it. Or bring boxes of non-perishables to shelters and soup kitchens. Perhaps make sandwiches and containers of hot soup and hand them out to those who are homeless. This is just a short list of potential things to do. Do some research as to what is available and what is needed in your area and take action.

There's an old saying, "Do something good.  Feel something real".  So see, this will really be a gift you give yourself.

And, if you care to, feel free to share with the rest of us what it was that you were able to do.

You will never regret it. As a matter of fact, it may become habit forming!

Thank You.


Wednesday, November 13, 2013

Eating Fall: Spinach and Ricotta Pie


This delicious pie resulted from my over buying fresh ricotta at our farmers Market this past weekend. If you love good quality ricotta you know it doesn't hang around for long and wasting food puts me into a total tizzy!  

We had sweets in the house and a cheesecake just wasn't doing it.  I didn't have all of the ingredients for lasagna. Plus I wanted something easy for a Monday dinner.

A few minutes on the internet led me to this recipe, which is truly cobbled together from many I read. Frankly I think it's probably better than some of them! 

I had all of the ingredients already - either in the refrigerator or down in the big freezer. That's my kind of recipe.

It's easy and very good - it was great for dinner but it could definitely work for lunch with a quick warm up and I have it on good information that it's great for breakfast.  I had to be sure you know!  OK here we go.

Spinach, Ricotta, Bacon, Leek & Mushroom Pie

Ingredients

Three large eggs
24 ounces (or so) of fresh ricotta cheese - if it's really wet, drain it in a sieve or colander for 20 minutes or so.
10 - 12 ounces of uncooked spinach - I had a big bag (2 pounds) of fresh spinach in the freezer.  A local grower is experimenting with "flash freezing" it. Makes it easy to take some but not all out of the bag. I hope he keeps doing it.

One cup of freshly grated parmesan cheese
Six or seven strips of regular bacon
One large leek, cleaned, and chopped
Two garlic cloves, sliced
Approximately a quarter pound of mushrooms chopped just a bit.  I had some mixed mushrooms - use whatever you like or none at all.  They aren't critical.

One pie crust - now you have heard me say that I keep Pillsbury ready made pie crusts in the freezer for just this sort of occasion.  Or you can use your own pie crust recipe.  Homemade would make this even better and I promise that I will use a homemade crust for it, just not on a Monday night!

Technique

Pre-heat your oven to 350 degrees

Lightly butter a pie plate - I like a glass pie plate for these sorts of recipes, you need a little depth.

Put your crust into your pie plate.

"Dock" the crust a bit - just make a few holes in it with a fork.
Put it in the oven for about 5 minutes.  You just want to get it started a bit. Take it out when it just starts to change color.

If your spinach is frozen, let it defrost.  To quick defrost it, put it in a colander and pour a little hot water over it. If it's not frozen, just be sure it's clean of sand. 

In a sauté pan, cook the bacon to almost crispy - it will cook a bit more in the pie.  Set it aside draining on paper towels. When it's cooled, chop it.

Cook the chopped leeks in the bacon fat; as they begin to soften, add the garlic.
In about one minute, add the mushrooms if you are using them.  Let the mushrooms get a little browned.  At this point you can add a dried herb for a bit of zing.  I added some of our dried thyme because I was using mushrooms.  Mushrooms and thyme love each other. 

Add a light sprinkle of salt and a good bit of freshly ground pepper to the mixture

Take the sauté pan off the heat and when it cools a bit add the chopped bacon, stir well to incorporate.

Beat the three eggs in a large bowl.  Add the ricotta and the Parmesan and keep whisking to incorporate the eggs into the cheeses.

Swutch to a large spoon or spatula and add the spinach to the egg & cheese mixture - mix it together well.

Then add everything from the sauté pan into the spinach mixture. Again - take the time to mix it well.

Pour the mixture into the pie crust and bake for 40 - 45 minutes. When you take it out of the oven, let it rest for ten minutes before slicing.  Enjoy!


Monday, November 4, 2013

Eating Fall: Eat the Real Thing!

At this time of year, among other delicious cold weather foods, we start eating oatmeal, pancakes and waffles, and soups and stews.  A few considerations are in order with some of these categories of cold weather good eats.

The first one is something that I admit does irk me a bit.  Those brown thick liquids in plastic bottles in your supermarket are not Maple Syrup! They are blends of high fructose corn syrup, food coloring and preservatives.  Please don't eat them. Find real Pure Maple Syrup at your Farmers Markets - and/or from time to time on the supermarket shelves. Only the real thing can say it's the "real thing". The other stuff is just flat out bad.  Yes, real maple syrup does cost more (it takes 40 gallons of sap to make 1 gallon of syrup). But again you will use less, enjoy it more, and not be putting yet another source of high fructose corn syrup in your body.

Also be aware - and very wary - of "instant" oatmeal. There are many nasty ingredients creating that convenience.  Steel cut oatmeal is available in bulk dry goods stores.  There are a ton of recipes for making oatmeal and you can make a big pot and keep it in the 'fridge - making it easy to grab during the week.

And that brings us to Pancake "mixes".  I had spent years truly in love with Bisquick.  What didn't it do!?!?  Then I learned about it's manufacturer - Kraft - who is one of Monsanto's most faithful mega corporations and a big user of GMOs. We have attempted to avoid bringing anything from Kraft into our home.  So - no more Bisquick.  However I have found that it is pretty easy to make a pancake or waffle dry mix.  Stored in a tightly capped container and kept in a cool place it will be available and ready for the addition of some milk, buttermilk and an egg just as easily as the big yellow box. 

The same "make your own dry mix" is also true for a good hot chocolate mix that just needs hot water.  We make a couple of big batches of that over the winter.  On a really cold morning, it's as quick as putting the kettle on. 

Lastly, it is also worth considering making big batches of soups and stews this time of year.  Pack them up in lunch sized servings, label, and freeze them.  These will be so much better than anything you can buy that's been commercially produced and canned. 

In the coming weeks I will be publishing some of my favorite "make your own" dry mixes and easy to make and freeze soups & stews. In the meantime please share some of your favorites

So, do it yourself.  Make ahead.  Use local, seasonal, natural ingredients.  Make your own dry mixes. Freeze your own. Read labels. 

Come Spring you'll be happy, well fed, and healthier!


Monday, October 28, 2013

Eating Fall: Romanesco and Creamy Pasta

This beauty is called Romanesco.  It is available now in the farmers markets.  Romanesco is very popular in Italy, specifically Rome.  In structure it is very cauliflower like; in flavor very broccoli like. I have family members who love to carefully break apart the little "trees", cook them, and place them on mashed potatoes for the holidays. So pretty and so delicious. 

I had a pretty large head of Romanesco (nearly two pounds) and we were craving a pasta dish.  So I made the following - it was amazing. And easy! 

Ingredients

One head of Romanesco (1/12 to 2 pounds)
Three large garlic cloves - leave the skin on the cloves
Extra virgin olive oil
Red pepper flakes
Three anchovy fillets (you can leave them out if you must, but they disappear and they provide so much flavor!)

Two to four tablespoons of Half and Half (full fat)
One pound of shaped pasta - I recommend penne; we used farfalle but I would use the larger penne next time
One half cup of grated pecorino cheese or Parmesan or a combination of both, plus more for service

Salt and freshly ground black pepper

Technique

Preheat the oven to 400 degrees
Cut up the Romanesco into bite sized pieces
Spread the pieces out onto a large cookie sheet
Put the large garlic cloves on the sheet with the Romanesco 
Sprinkle everything with the EVOO, and salt & pepper to taste
Stir the mixture so that everything is coated and spread out on the cookie sheet
Cook in the 400 degree oven for 30 minutes or until the veg and the garlic are fork tender 

When you remove the cooked Romanseco and garlic from the oven, keep it warm and cook the pasta

Cook the pasta in a pot of salted, boiling water
Before draining the pasta take one cup of the pasta water out and set it aside

Drain the pasta, put the pasta back in the empty pot

Mash together the roasted garlic (by squeezing it out of its skin), the anchovy fillets, and dried red pepper flakes to taste

Toss the mashed mixture with the pasta in the pot
Add the Romanesco
Mix together the cream and the grated cheese
Add the cheese and cream mixture to the pot -  mix well 

At this point, you can thin your sauce - if you want to - with a bit of the hot pasta water you set aside; a little goes a long way! You probably won't need the whole cup of hot pasta water.

When the mixture is well combined, spoon it into pasta bowls and serve

For service offer additional grated cheese and extra virgin olive oil for a drizzle

Enjoy

Note:  As mentioned we used Farfalle - it was purple and white because it was made with squid ink. So in the second picture that's the dark edges you see. 


Thursday, October 10, 2013

Eating Fall: Quinoa Stuffed Eggplant

We have had a very successful growing season with some things, especially Eggplant.  The eggplants we put in this year are small to medium sized with a lovely purple and white "striping" on their skin.  They have been coming in quite well since mid - summer. So, with this bounty, we have done a number of batches of Babaghanoush, we've made lots of wonderful eggplant Parmesan with homemade mozzarella, we pounded it and breaded and fried it, we made batches of ratatouille, and we made and froze batches of the delicious Nona Sauce - basically red sauce with eggplant literally melted into it.  We were open to some new ideas for our eggplants.

On a recent trip to the market we picked up a box of all natural Quinoa.  Note:  even this healthy food product does not escape the long arm of agri-biz.  You must look at the label and read the ingredients' list. You want to find that list to be very short. It should say, "Quinoa". 

A check of supplies one recent evening yielded two of our eggplants - one medium and one small, pulled that day; a box of Quinoa; a few of our tomatoes; some of our peppers (green chilies roasted); garlic; capers; some red onions; panko bread crumbs; our flat leaf parsley; our basil; a bit of Parmesan cheese; and, from our cheese CSA, a hunk of goat milk mozzarella.  This stuffed eggplant halves recipe was the result of combining those ingredients. Good fresh ingredients are the most important element. Again, remember this is more of a technique rather than a recipe. You can stuff your eggplant shells with lots of other ingredients; just cut your eggplants in half, scoop out the flesh or meat of the eggplant and start creating!

Il Moya Quinoa Stuffed Eggplant

First cook the Quinoa. Generally follow the box instructions. It's very much like cooking rice.  You can use water but we had some lo salt chicken stock in the refrigerator which added another layer of flavor.  Once the Quinoa is done you can hold it and keep it moist by taking it off heat, putting a clean towel over the pot and putting the lid back on the pot.

Cut the eggplant/s in half and scoop out the eggplant meat. Set it aside.
Chop up the red onion, the peppers you are using, the tomatoes, a clove or two of garlic, the basil, and a few salt cured capers (these should be soaked for a bit and drained to remove the salt).

I sautéed everything in one tablespoon of butter and one tablespoon of extra virgin olive oil until the mixture softened up and gave off some juices - about 3-5 minutes over medium heat. Stir often. Add salt and freshly ground black pepper to taste.

Add the eggplant that you scooped to the pan mixture;  I chopped some of the eggplant fine and left some in bigger chunks.

Cook over medium heat for another five minutes. 

Add the Quinoa to the other ingredients in the pan and stir to incorporate fully.  Just a minute or so.

Rub a thin film of olive oil all over a baking pan and lay the eggplant shells in the pan.

Sprinkle grated Parmesan cheese all over the inside of the empty eggplant shells.

Fill the eggplant shells with the Quinoa and eggplant mixture. Lay thin slices of the mozzarella over the mixture in each shell.

Chop the parsley and mix it into enough breadcrumbs (panko are best) to cover the top of each of your stuffed shells.

Sprinkle the breadcrumb/parsley over each filled shell, sprinkle each with a few drops of extra virgin olive oil and bake in a 350 degree oven for 35 minutes or until the shells are soft and the stuffing is bubbly and the cheese is fully melted.

Let them sit for just a minute prior to service.

Enjoy!


Saturday, October 5, 2013

Food Questions Asked by 70 x 7 The Meal - Your Thoughts?


Tonight we had the extreme honor to participate in the celebration of thirty years of the Mural Arts program here in Philadelphia. Our city mural arts program is second to none and a model for other cities. The celebration of this important milestone took the form of a "70 x 7" dinner installation as have been carried out in many locations around the world by the artists Lucy & Jorge Orta (www.studio-orta.com). This was Meal XXXIV.  This was an "invitation only" event which led to a very diverse group of Philadelphians sitting down to dinner. I stood up once and looked out over the lines and lines of tables and people and I admit, I felt a tear.  This is my city - and it was well represented in the wide array of folks at those long tables.  Wonderful. 

So, to say it was an incredible event would be an understatement.  Nine hundred people dining, debating & meeting and greeting in the shadow of Philadelphia's beautiful City Hall. We enjoyed a family style meal of four dishes using heirloom vegetables prepared in delicious ways by our fabulous local chef Marc Vetri.  The topics discussed during the meal focused on heirloom vegetables and the loss of variety in food (i.e. 100 years ago there were 400 kinds of tomatoes; sadly, there are now 79), as well as how to get good fresh food to people in a local, seasonal and sustainable manner, and other challenging issues pertinent to the work of feeding us all.

Below are some pictures of the beautiful tables (as I mentioned, dinner was served for 900, the largest 70 x 7 meal in the world), the gorgeous and delicious food, and the two beautiful plates we were gifted with as attendees. We will cherish those limited edition plates! 

I am personally still buzzing from the event - and suspect I will be for awhile.  That said, I am interested in how other folks would respond to the questions that we were sent to consider before the event. We discussed these questions during dinner and we recorded our answers, which were then collected by the event staff. 

Here are the questions we tackled at the dinner. How would you have responded?

1.  What are the major food issues facing the world today?
2.  What are you willing to sacrifice in food quality or safety for convenience?
3.  How much diversity in the food supply is good for the environment and for people?
4.  What are the benefits and drawbacks to heirloom foods vs. genetically modified foods (GMOs)?
5.  Should food labeling be required to identify whether foods contain genetically modified organisms (GMOs)?

What are your thoughts?  Thank you!

Oh - the picture at the end is just a shot of the most beautiful City Hall in America. Thanks. 


Tuesday, October 1, 2013

Sweet Memories: Mimi, Me & the Jersey Tomatoes

Along about mid - July in my Hunting Park (Philly) neighborhood, the huckster would sing a different song as he came down the wide alley between our block - 9th Street - and 8th Street. It was usually very early in the morning. In those days of no air conditioning, he got an early start; his was a very hot job.

Sometimes I would wake up to the "song" and I still hear it clearly in my memory today.

                          "Jersey tomatoes. Three pounds for half a dollar". 

He would stretch out the "jersey tomato"part of course. It was a sing song that would be repeated over and over again loudly until he would find a spot, stop his truck, and begin to attend to all of the neighborhood women heading towards him.

Half a dollar/three pounds. I can't even think of a way to examine that reality! So I'll move on.

Oh those tomatoes!  Mimi - my grandmother, and chief cook and bottle washer in our home - would come into the kitchen with her assorted produce purchases and spread them out to examine them. Much as I do today. And always she would very carefully handle those tomatoes, giving them their own wide bowl.

Then the Hellman's, some sandwich plates, a couple of knives, salt, and the white sandwich bread would be brought to the table.  The bread was always, always, Strohman's. She despised that "Wonderful" bread! We never could get her to say Wonder.  In later years she discovered Pepperidge Farm white bread, but at the big house on 9th Street, it was always Strohman's. 

Mimi and I would sit at the table and she would make us tomato sandwiches.  Sandwiches with lots of slices of tomatoes, very thinly sliced and ever so slightly sprinkled with salt.  We were the only ones in the house who ate them! Not my grandfather, my parents, my sister, or our friend Marion who rented the apartment upstairs wanted any part of a sandwich with "only a tomato" on it. Crazy people.

Oh, the deliciousness of it! The warmth of the tomatoes, the way the juices would run into the soft white bread, the creaminess of the mayonaisse with tomato juices mixing into it, and no matter how hard I tried, the juices running all over my hands and face. 

We would look at each other over our sandwiches and smile and moan and eventually laugh at what a mess we were making. 

These days I make my sandwiches with my homemade mayonaisse, and soft white bread from a local bakery, but it is still all there. I see her laughing as I eat. Laughing because we were so glad that the others didn't want to share.  More for us. As I got older, there were a number of things that only Mimi and I enjoyed.  Dishes that nobody else in the house wanted any part at that time anyway. Food was a big connection between a woman who'd been a flapper in Atlantic City and, as a result, was sent off to Danville, Pennsylvania to work on a relative's (who were Mennonites) farm for many years, and the wacky sixties kid I was to become.

This picture is the first  Ramapo - a real Jersey tomato - that we harvested from our garden here at Il Moya.  It looks like we will yield about 10 or a bit more from our planting.  Every one of those tomatoes will be eaten exactly the same way. I'll be sharing with my better half of course, but these tomatoes won't be cooked, frozen, oven dried or anything else.  They will be thinly sliced, placed on soft white bread that has been spread with mayo and a sprinkle of salt. We will eat and the juices will run down our hands and we will smile. 

Thanks Mimi!

                          "Jersey tomatoes. Three pounds for half a dollar".


Thursday, September 26, 2013

Eating Fall: Dealing with All of that Basil

It's time to start figuring out what you are going to do with all of the beautiful Basil growing in your garden.  Basil is a very popular choice. It's easy to grow, depending on the overnight heat, it will grow like crazy - even in a window box. It's a wonderful herb if you only have a small space or a window box, fire escape, or whatever as long as it has sun and warmth and water it will do very well.  Basil is also a versatile herb.  It's great in sauces, soups, eggs, and makes delicious flavored oils. And of course, Basil is the main ingredient in traditional Pesto.  A jar of pesto will hold well in the refrigerator for a couple of weeks if you keep a half inch or so of extra virgin olive on top of the pesto as you use it. 

For long term storage of my tons of beautiful Basil, I use three basic techniques:

     Freeze leaves
     Freeze a purée of leaves and extra virgin olive oil
     Freeze Pesto

For the first technique, wash and dry your Basil (always wash any herbs before you use it; you never know who's set up housekeeping in there!).  Pat it dry, pull the leaves from the stems and add the leaves to a good freezer bag. After you fill the bag squeeze out all of the air, label and pop it 
in the freezer. The leaves will turn black but they will maintain their flavor for sauces, soups, etc. When you take leaves out let them sit for a few minutes to defrost and give off excess moisture.

For the second technique, just add the leaves - treated as above - to your blender with extra virgin oil and just a touch of kosher salt.  Purée the mixture and pour it into ice cube trays.  Now I know you may have to go out and buy ice cube trays because of the ice making capabilities of many refrigerators but it's worth it.  Plastic trays stack together nicely for storage and if that ice maker ever goes south - you're ready!  When the "cubes" are frozen, pop them out, put them in a good freezer bag, label it and put it in the freezer.  With a couple of cubes, you have a delicious fat for pan roasting fish, steaming clams, spreading on hot bread or just tossing with hot noodles.  Wherever your imagination takes you, they are very versatile. I can tell you that they don't work as cubes in a Bloody Mary - nope not at all. Trust me.  It's an oil thing!

The last technique uses the blender method but does it with actual Pesto in place of just leaves and olive oil.  I keep the cheese out of my Pesto cubes but I do add the Basil, the extra virgin olive oil, garlic cloves to taste and a bit of salt to the blender and give it a good whirl. When it's incorporated I add some pine nuts and just stir them through. Pour into the ice. Use trays and repeat the freezing and bagging process. I like to vary the pesto a bit; I'll freeze a bag of "spicy" pesto (with some dry hot pepper flakes blended in), and a "traditional" pesto mixture.  Be sure to mark your bags!

Note:  I am not a fan of dried basil.  Some herbs, like oregano and marjoram, develop wonderful flavors when they are dried. In my opinion basil loses flavor when dried.  I always dry a little because I have so much, but I try to use it quickly and invariably I don't use it all.

With these techniques - especially the second and third ones, you can walk in the door on a weeknight and have a nice start on something delicious. And if you look in the cold cases at the supermarket you'll notice these "flavor starts" packets or whatever the various manufacturers call them. The packages say that you should just start with the cube or envelope and add your ingredients.  Well I have to say, somewhere in the mix of those things are olive oil and herbs. But - and this is a big but - there's a ton of chemicals and additives in there too.  

Yours will be pristine and delicious!


A Jar of Homemade Pesto  

Some of My Genovese Basil

Wednesday, September 25, 2013

Eating Fall: Second in a Series - The Incredible Fig

In the past few weeks, Figs have been front and center in the Farmers Markets. We're really lucky here in South Philadelphia to have tons of mature fig trees all over the neighborhood - and owners of those trees who sell their figs through local markets.  It's not unusual to get to the checkout and see beautiful figs in egg cartons with a sign that says, "Guido's Figs, one dollar each/$9.00 for a dozen". These figs are, as you can imagine, incredibly fresh, delicious and raised pretty much in an organic fashion.

Certainly Fig Jam is a great product to make with wonderful fresh figs. Our local canning guru, Marissa McClellan, has a great and easy recipe for fig jam in her wonderful book, "Food In Jars". We used her recipe to put up a dozen jars this year.  

But there are many other things to do with this heavenly fruit.  Below is a picture of a Fig Tart that we made recently.  It's simply one sheet of Puff Pastry, rolled out a bit, scored  around the edges, and filled with quartered figs.  My better half does the beautiful placement of figs onto the dough (second picture). I drizzled a bit of local honey over the figs and baked it at 375 degrees convection (400 degrees regular oven) for about 12 - 15 minutes.  Be sure the underside of your crust has a chance to get crisp - figs give off a lot of (heavenly) juice as they bake.  The accompaniment for this tart is three tablespoons of crushed shelled pistachios into a cup of thick Greek yogurt, sprinkle a little honey or sugar into the mixture and whip it together. Serve a dollop with each slice of the tart. 

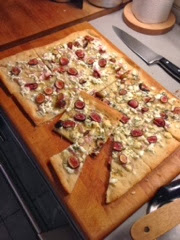
My second favorite use of fresh figs is pizza. As you know if you follow the blog, we love to have Pizza Night at our home. One of the things that has made it so enjoyable is the fact that we buy pre-made thin pizza crust (Pillsbury, usually displayed with the rolls, in the dairy case).  Yes, from time to time we go the whole "scratch" road and we usually alway have a local bread or pizza makers dough in our freezer.  But on weeknights there is nothing like unrolling a lovely thin crust onto an oiled cookie sheet and getting creative.  And this is the perfect crust for Fig, Goat & Blue Cheese Pizza!

Oil the baking sheet with a bit of good EVOO.  Spread out the dough as close to the edges of the pan as you can - you want a thin crust after all - see photo.  Then pre-cook the pizza dough for 5 - 7 minutes at 400 degrees.  See photo. You don't want it very brown or anything, you just want a nice mild crispness.

Add your cheeses.  In this one we are doing one half chèvre, one half chèvre and blue cheese, with thinly sliced red onions and good EVOOO and chopped fresh rosemary over all. See photos. 

And then add the figs, sliced into rounds in our case because we are getting a little low on figs. The entire pizza is drizzled with a good extra virgin olive oil and popped into a 400 degree oven for about 10 minutes.

Let the pizza rest for about five minutes and slice. This is a great pizza for snacks with cocktails, as a first course or as a main with a great green salad.  

Go get some Figs and, at the very least, just stand there and eat them!
Enjoy.


Fig Puff Pastry Tart with 
Pistachio, Yogurt topping 
Fig Tart - Pre-Bake
Fig Pizza dough prep

Post pre-cook of pizza crust
EVOO and cheeses added
Thinly sliced red onions and 
Fresh, chopped rosemary 
Added
Figs added, with another 
overall drizzle of EVOO.    

Sunday, September 22, 2013

Eating Fall: Easy Coq au Vin for Two

Fall is a great time for cooking and eating.  Over the next few weeks I thought it would be interesting and fun to share some recipes that seem to fit the return of cooler weather.  This first recipe is adapted from Ian Knauer's great cookbook, The Farm.  This version is just right for two people and if you round it out with some late season corn, and a salad or some sautéed greens, it makes an elegant and easy early Fall dinner.

Easy Coq au Vin for Two

Ingredients

Two chicken legs ( whole legs and thighs)
Salt & Pepper
1 Tablespoon of Fat - Bacon Fat or Duck Fat or a combination (which I used) OR 1 Tablespoon of extra virgin olive oil (see note)

One leek, cleaned and chopped
One celery stalk, leaves included, chopped 
One carrot, sliced
Three garlic cloves, smashed

One cup of dry red wine - whatever you would drink
One bay leaf
One large sprig of fresh thyme

Technique

Pat the chicken legs dry
Season the legs with salt and pepper

Heat the fat in a heavy skillet (I used a medium cast iron skillet)
Bring the fat to a shimmer
Sear the chicken, skin side down, until the skin is golden brown - this should take about five minutes - do not turn the chicken over, just remove it to a plate

Add the leeks, celery, carrots, and garlic to the skillet and cook - remember to scrape all of the brown bits (called "Fond") as you cook the aromatics.
Cook until the vegetables are golden, but not quite brown, about 6 - 8 minutes.

Add the wine, bay leaf, and thyme to the skillet and bring to a boil.

Put the chicken back into the skillet, skin side up, and simmer with a cover on the skillet for about 20 - 25 minutes.

Uncover and simmer for another 5 - 7 minutes to slightly reduce the sauce.  

Remove the chicken to a warm plate. 

Add one or two tablespoons of unsalted butter and whisk until the butter is incorporated into the sauce.

Remove the bay leaf and season the sauce with salt & pepper.

You can strain the sauce if you wish.

Serve the chicken with the sauce ladled over it.  Good crusty bread also makes a nice accompaniment.

Note:  I - and this idea is right from Ian Knauer's Book - keep a jar of mixed fat in the refrigerator.  What Knauer calls a Master Fat. So when I make bacon - and this kind of fat keeping is what we are most accustomed to - I pour off the fat (keep the brown bits out) into the jar. When I cook duck breast, if I am not using the rendered fat for fries, I pour it into the jar. Recently, I roasted a piece of Peameal Bacon. Some of that rendered fat is in the jar.  Knauer suggests that every few weeks you can sit the jar in warm water to incorporate the fats. This makes for a very, very delicious cooking fat and in this recipe it really adds a flavor level! Master Fat - highly recommended.


Wednesday, August 28, 2013

Smothered Eggplant Sauce Recipe


We have had great success with our eggplants this growing season.  We have been harvesting lots of these medium sized delicious eggplants for weeks now.  We both love eggplant Parm, Baba Ghanoush, fried eggplant, caponata and many other eggplant based recipes.  That said, one of our favorite tomato sauces ever is this luscious blend of good tomatoes and melting chunks of eggplant.  It goes by a number of names:  Nona Sauce, Summer Sauce and Melanzana Affogata (smothered eggplant).

A number of years ago we had dinner at a friends home.  She is an amazing cook and we always learn something from her, along with having fabulous dinners.  Our pasta course that evening was Penne with Nona Sauce.  We could not figure out what the "secret" ingredient to the delicious silky sauce was. Finally she told us. We've been hooked - seriously hooked - ever since.

You can make this with fresh tomatoes or really good (San Maranzano) canned tomatoes. For this recipe I used canned tomatoes.

Ingredients

3 1/2 pounds of really good canned tomatoes 
2 pounds of firm eggplants
1/4 cup of extra virgin olive oil
Approx 1 1/2 cups of finely chopped onions
1 - 2 teaspoons salt
2 garlic cloves finely chopped
1/4 to 1/2 teaspoon of dried red pepper flakes ("quanto basta" - as much as you like)
3 large Basil branches

Technique

Trim and peel the eggplants - it's your call re: the skin.  I like to do a "striped" peeling so I get some of the skin into the recipe. It all depends on the type of eggplant you are using.

Cut the eggplant into 3/4 inch chunks

Over medium heat, Stir together the oil, the onions, and a 1/4 teaspoon salt 
Cook for about 5 minutes stirring frequently, until soft
Add the chopped garlic into the center of the pan - push the onion to the sides - until it just begins to brown

Stir in a tablespoon of water, stir everything together and cook for another minute

Add the eggplant cubes to the pan, sprinkle with 1/2 teaspoon of salt, and turn well so that the eggplant cubes get coated with the oil, onion, and garlic

Cook over medium-low heat, stirring frequently for about 10-12 minutes until the cubes are very soft but not mushy.  If the mixture begins to get dry during the 10-12 minutes, add a bit of water - the eggplant needs the moisture to cook.

Pour in the tomatoes and their juices.  Add one and a half tomato cans full of water to the pot; swirl the water in the can to get all of the tomato sauce.

Sprinkle 1/2 teaspoon over the mixture
Add the red pepper flakes
Stir to blend every thing together
Submerge the Basil branches down into the sauce

Cover the pan and raise the heat to medium

When the sauce boils, lower the heat to a simmer and cook, covered, for at least 40 minutes. Stir occasionally. 

You want to see the eggplant breaking down and melting into the sauce

Uncover the pot and let the sauce reduce, while stil on simmer - for about 35 - 40 additional minutes, stirring frequently.

When the sauce is the consistency you want, pull out the basil branches and toss them

Note:  this sauce is going to be thick and rich.  Sauces like this are best with shaped pasta, such as Penne, Farfalla, bow ties, etc.


Sunday, August 18, 2013

"Tastes Just Like . . ."

No it doesn't! You know it. I know it. Nobody's fooled.

I despise "artificial" - really artificial anything. But especially artificial food and ingredients. In my opinion, the American way of eating - which seems to be destroying the health of many Americans - is packed way too much with artificial ingredients.

I know some people must avoid certain things - but I am also aware that there are real substitutes for folks with certain allergies and ailments, and they aren't always artificial. 

I recently heard a friend say about someone, "Oh, she's a 'Health Freak'".  This because she used fake butter.  But not just any fake butter - fake spray butter!  Really?  Health conscious? Doubtful. 

It's funny the terms we use. For instance, whenever we run across someone who truly is a limited eater, we call them that, limited.  However, they want to be identified as picky but no, they aren't. Real food lovers are picky.  You know these limited folks. It is rarely a health issue for them, it's that they are afraid of food! I find being out to a meal with limited eaters a real challenge - but it's worse to try to cook for them! What amazes me most about limited eaters is the level of artificial ingredients they ingest on a regular basis. Do a little observation of your own with the limited eaters in your life. Picky wouldn't do that, that's for sure. 

OK - Some of the things on my permanent awful artificial list:  

Diet soda; juices with only 10% juice (huh?); Astro turf; margarine; artificial sweetners of any kind; watered down milk; pleather; food coloring; cheese/not cheese; flowers; all those unpronounceable ingredients in "shelf stable" TV dinners (sorry I don't know what else to call them, I'm a '60's kid); and almost all of the contents in Lean Cuisine - especially whatever they do to create those artificial aromas!

I think we need to send a message to those wacky food "scientists". Stop! 

How do you feel about artificial ingredients? Which ones really bother or worry you? How successful are you in avoiding them?


Recipe:  Homemade Tomato Paste

Tomato paste is a useful ingredient for making not only sauces but homemade ketchup too.  Commercial ketchup and commercial tomato paste contain High Fructose Corn Syrup, which is a great thing to knock out of your diet wherever possible.

This paste keeps in the refrigerator for up to 3 months and you can also do small containers and freeze them! 
Whole tomatoes are available now and it couldn't be easier to make. 

Ingredients 

Five pounds of tomatoes chopped - if you can get "paste" tomatoes by all means use them but regular slicing tomatoes will work perfectly
1/4 cup of extra virgin olive oil, plus more for topping off your containers 
1/4 teaspoon coarse salt

Technique

Boil the chopped tomatoes - Don't add water - the tomatoes will give off their juices on medium high heat.  You'll have liquid in no time.

Boil the tomatoes for about 8 - 10 minutes

Strain the whole pot to remove skins and seeds - work on this stage. Push the good stuff through your strainer, you want all of that pulp and juice.

Return the juice and pulp to the pot 

Add the olive oil and the salt. Stir

Bring to a boil and keep stirring. 

As the mixture thickens, continue stirring and reduce heat until it starts to reduce to a paste. Stir every minute or so. It will eventually thicken into a nice paste. 

It's done!

Transfer the paste to lidded jars.   Let it cool uncovered.

Top each jar with a thin layer of extra virgin olive oil
Cover and store in the refrigerator or freezer

Easy and all natural!


Sunday, July 28, 2013

Busy, Busy, Busy - and Worth Every Minute!

If you are a gardener, foodie, urban farmer, cook - whatever - this time of year is an orgy. Everything is growing like crazy in your garden, the tables and bins at the Farmers Markets are overflowing with gorgeous fresh produce, meats, breads and handcrafted small batch jars of nut butters, pickles - there is just so much, in so many places! Where to begin?

It is that time of year when cooking, baking, freezing, drying, and canning become obsessive activities for many of us.  We dream of a larder and a freezer chock full of delicious treats and provisions to see us happily through the long, cold winter.

Here at our little urban homestead, we're happily stocked with bags and bags of local strawberries, blueberries, blackberries and cherries. They are labeled and stacked in our "fruit bin" in the big freezer. We've also tucked in some bags of chopped rhubarb after discovering that the "jam" and syrup (great for martinis, pancakes) we made worked just as well with frozen rhubarb. We have many bags of local green beans and corn (off the cob) in the freezer as well. 

Now we're getting ready to start pickling - our Cucumbers are coming in really well, as is our Okra. Okra can also be slightly blanched and frozen.  Soon the grapes will be in and it will be time for jam and grape juice production. 

Our successful crops of eggplants, peppers and zucchini guarantee we'll be feasting on ratatouille, eggplant Parmesan, stuffed zucchini and the like.  We have long strings (ristra) already of cayenne peppers hanging in the kitchen, and of course the kales and the mustard greens just keep going. We've already made a few batches of pesto and there are herbs hanging and drying all over the place.  

Yes. It's a busy time - but oh, so worth it! All Fall and Winter long we will have the basis for great meals, snacks and desserts - all from our own or others locally grown products. Our larder and freezer will go a long way to feeding friends and family for months. I just love knowing that. I must have been a Depression baby in a past life! Below are shots of some of our crops. What's more beautiful? Not much, I think.  Here's a couple of recipe/techniques that are great for the summer. 

Recipe:  Cucumber Salad

Take a couple of medium cucumbers, if you like, you can remove some of the skin - give the cukes a "striped" look. On a good fresh medium sized cucumber - ones that aren't "waxed" by giant producers you don't need to remove the skin. There's good stuff in that skin!!!

Thinly slice red onion (at least 1/2 for two cukes) and place the slices in a bowl
Sprinkle the onion slices with good red wine vinegar & sea salt.

Let the onions marinate in the vinegar for about 10 mins.

Cut your cucumbers into slices or chunks - whichever you prefer.

Add the cucumber to the red onion, add extra virgin olive oil - about three times as much oil as vinegar, but really tasting the salad works best. Some like it tangy.

Toss everything gently. Add more salt if needed. Add some freshly ground black pepper. Toss again.

Let the salad sit at room temperature for about 15 minutes before serving.

This makes a great side dish but it's also great over broiled fish and don't get me started on how good a pile of this is on a warm, buttered roll or piece of toast. Really. Trust me.

Recipe/Technique:  Pasta Frittata

At this time of year, we find ourselves making pasta with fresh veggies and fresh tomatoes. The leftovers from these dishes are perfect for pasta frittata.

All you have to do is add some beaten eggs, milk or cream, a bit of regular flour, and a pinch of baking powder to your leftover pasta and vegetables. Mix it all up really, really well.  Add some chunks of cheese and anything else you have that you want to use - sliced mushrooms, peppers, whatever. It really depends on what was in your original pasta dish and what's hanging out in your 'fridge.

Pour the whole mixture into a lightly buttered pan - or a non-stick pan (I use one of my cast iron pans because I love the finish).

Cook the frittata over medium heat until the egg mixture is set up. Run a knife around the pan to see if it's close to done. Slide your spatula under the frittata to test for doneness as well. 

You can either finish the top by putting a lid on the pan for a few minutes, flashing the pan under your broiler, or flipping the frittata out onto a plate and sliding it back into your pan so that the top is now the bottom. 

Frankly, I'm all about the broiler flash - always works,  no extra dish, etc. 

I slide the frittata right out onto a cutting board and let it sit for at least 10 minutes and up to 30 minutes for room temperature. It delicious at any temperature. See the last picture.


Friday, July 19, 2013

Heirloom Tomato, Onion, and Cheese Pie

Now is the season of the Heirloom Tomato.  Here is a wonderful way to make use of some of this short term bounty. This pie is Summer Comfort Food at its finest!

Tomato, Onion, and Cheese Pie

Ingredients

One pastry shell - you can make your favorite recipe or you can buy pie pastry.  Don't buy the shells in the aluminum pans; upgrade to the rolled dough in the red box made by Pillsbury.  These are what I use for this sort of recipe. There are two to a box and they keep really well in your refrigerator or freezer. 

2 1/4 lbs of assorted heirloom tomatoes, thinly sliced
1 medium sweet onion chopped
1 tablespoon canola oil
1/4 cup fresh basil
1/4 cup fresh flat leaf basil
1/2 cup freshly grated Gruyere (or more if you want it really cheesy)
1/2 cup freshly grated Parmigiano Reggiano
 1/4 cup of mayonnaise (homemade really makes it delicious, if you can do it)

Techniques

Preheat the oven to 425 degrees and "blind bake" the pie crust (line the crust with foil and pour in pie weights or dry beans and spread them around).  You don't want the crust to rise, you do want it cooked quite a bit so that it doesn't get soggy when the ingredients are added.  Blind bake the pie crust for 15 - 20 minutes.

Remove the cooked crust from the oven, remove the pie weights and foil and lower the oven to 350 degrees. 

Place the sliced tomatoes on paper towels and sprinkle with salt and let stand for at least ten minutes (you are drawing out excess liquid).

Chop the basil & parsley and blend - this needn't be a fine chop.

Sauté the chopped onions in the canola oil with salt and pepper to taste. Sauté for about 3 minutes to soften.

Pat the tomato slices dry
Pat the chopped onions dry
Stir together the cheeses and the mayonnaise 

Layer the sliced tomatoes and onions with the chopped herbs in the pie crust (see the pictures)
You are layering:  tomatoes, then onions, then herbs, a little salt & pepper and then, repeat.

After you have used all of the ingredients, spread the mayonnaise and cheese mixture over the top of the pie. (See picture)

Bake at 350 degrees for 30 minutes.  Let the top get bubbly and slightly brown.  

Serve hot.
Enjoy

This recipe was adapted from Southern Living Cookbook 2012 by Virginia Willis


Monday, July 15, 2013

Pisciotta - Olive Oil Cake

This a delicious, versatile cake.  I use a Limoncello based glaze very often, but it is also wonderful topped with fresh berries and marscapone or ice cream. It is wonderful just plain with coffee.  People never believe how much olive oil is in the cake - the taste is barely, but deliciously present - but it's the extra virgin olive oil that gives this cake its incredible moisture, as well as it's long shelf life. 

Once you make it, you'll crave it. I promise.

Ingredients

2 eggs
1/2 cup plus 2 tablespoons sugar
The zest of one lemon
Salt - a pinch
1/3 cup of dry Marsala wine (I have substituted with a dry tawny port)
1/3 cup of whole milk
3/4 cup extra virgin olive oil - for the batter
1 tablespoon extra virgin olive oil - for the cake pan
1 tablespoon Baking Powder
11/2 cups all purpose flour

A tube baking pan.  I am posting this particular picture because I have no idea where my tube pan is (in a box somewhere) so I made one.  This is a round baking pan with a biscuit cutter.  When I poured the batter into the pan I put a glass canister full of sugar on top on top of the tube to hold it in place and tight to the surface of the cake pan.  As you can see, no batter seeped through in baking and the cutter slipped out easily. Remember to oil the biscuit cutter too!


Technique

Preheat the oven to 400 degrees
Beat the eggs with all of the sugar - you want it foamy and pale
To the eggs and sugar add the lemon zest, salt, wine, and the 3/4 cup of EVOO
Mix thoroughly

Mix the baking powder with the flour 
Add the flour mixture to the wet mixture and mix thoroughly - you really don't want lumps so it needs a good mix

Smear the pan with the tablespoon of olive oil
Pour the batter into the pan 

Bake for 30 - 40 minutes.  You are looking for nicely browned and a clean toothpick when testing the middle.

Let it come to room temperature, then remove it from the pan.

My Limoncello Glaze

Pour1/4 cup fresh lemon juice ( no bottle, don't bother) and 1/4 cup of Limoncello into a small saucepan

Add a teaspoon of sugar and one pat of butter

Whisk over medium heat until well blended

Brush all over the cake and let it sit for a few minutes

Serve and enjoy

Sunday, June 30, 2013

A Simple Summer Cobbler

At this time of year, the berries are appearing at every Farmers Markets and those of you who grow berries are harvesting daily. There are jams & jellies and salads and berry ice cream and, well you get it.  There are lots of possibilities.  Still sometimes the best thing you can do with a mix of berries is a cobbler. This particular cobbler, with a dollop of vanilla ice cream on top is perfect for the 4th of July.

This is a very flexible recipe.  I made this based on the size cobbler I wanted, but you can double all of the ingredients and just use a 3 quart baking dish; for the following I used a two quart glass baking dish.  You can also use a good cast iron skillet. Next time I'm using my skillet!

Recipe:  Summer Berry Cobbler

Ingredients

2 oz (4 Tblsps) unsalted butter - cut into pieces

1/2 cup of flour

1/2 cup of granulated sugar

3/4 teaspoon of baking powder

Scant pinch of salt

1/2 cup of milk

1 1/2 cups mixed berries (I used raspberries and blueberries)

Technique

Position the rack in the middle of the oven and pre-heat the oven to 375 degrees
Put the butter in your baking dish and put the dish in the oven as soon as you set it - the butter will melt totally as the oven reaches temperature

Whisk together the flour, sugar, baking powder and salt until well combined

Add the milk and whisk until combined - a few lumps are fine

Take the baking dish with the melted butter out of the oven and pour the batter over the butter
DO NOT MIX

Scatter the fruit over the batter, adding more fruit into the center and less around the edges

Bake until the top is a rich golden brown; about 40 minutes

Sprinkle with powdered sugar

Serve with vanilla ice cream, if desired


Tuesday, June 18, 2013

Mixed Leafy Greens & Ricotta Pie: A Technique/Recipe Using the Bounty of the Season.

This is another one of those "recipes" that I think is really more "technique". You can adapt this with many ingredients. It's basically about using leafy greens, good cheese or cheeses, eggs, some aromatics, some seasonings and a pie crust and having fun.  This is the kind of dish that you can eat hot with a salad for dinner, have at room temperature on a buffet, or just grab a slice to take for a very delicious brown bag lunch.  It's also totally wonderful as a midnight snack. 

Here's what I did with this first go around. On the right hand side of the first picture you'll see my main ingredients. I needed to harvest a good deal of leafy greens from our garden.  In the bowl is Lacinto (black kale), mustard greens, kale,  and Swiss chard.  I also had a big bunch of Par-Cel (leaf celery) from my garden.  

From the Farmers Markets I had: Some Trumpet Mushrooms, Purple Spring Onions and Garlic Scapes. I had a container of gorgeous ricotta from Caputo Brothers Creamery. I also had some eggs and a hunk of Reggiano Parmigiano.  I had a small piece of Guanciale which I diced and fried up. You  could use bacon, salami or no meat at all. I had a spice called Berbere - an Ethiopian chili and spice blend (which is actually pretty widely available) - and I decided to go with that for my mixture. And, best of all, I had pastry doughs in the freezer.

The important things to remember:

Wash your greens thoroughly.  Blanche your greens in some boiling water for just a minute or so - longer for the "stronger" greens like black kale.  Take them out of the boil and put them into a bowl of ice. Hold them there. 

Chop your aromatics - in my case, the Scapes, the Spring Onions and the Par-Cel.  I also chopped the mushrooms.

Then take your leafy greens out of the ice and chop them - chop them all together and chop them very well.  I like to be able to use stems - there is flavor and nutrients there - but you have to do a good chop!  Mix your greens and your aromatics together. Stir well. Add a bit of salt and pepper. This is when I also added my Berbere spice. Stir well. 

I beat together one cup of milk and four eggs. To that I added the ricotta (in my case 1 1/2 cups). I whisked the egg mixture and ricotta well. I poured the egg and cheese mixture into the greens and aromatics and stirred it very well.  I added the diced Guanciale and again stirred very well.

I moisturized a Springform Pan with a bit of Ghee. I added the defrosted pastry dough to the pan.  I then spooned the whole mixture into the dough in the pan (see picture).  I sprinkled the top of the mixture with grated parmesan. Then I folded the dough up in a seemingly attractive manner. I brushed the top of the dough with some of the whey from the ricotta. An egg wash would work as well.

Bake at 350 degrees for between 50 minutes and an hour. Let it rest for a bit before removing the sides of the springform pan.  Note:  I pulled it out and grated more Parmesan over the whole pie for the last 15 minutes. It makes a nice crusty top. 

So - try it with what you like! You need the veg. You need some spices to build flavor - or just go with good salt and fresh ground pepper. You need a binder ( the cheese and eggs and milk). And, you need a pastry shell of some kind. 


Play with your ingredients! And don't forget to share!